Wednesday, September 11, 2013

Paleo Chia Pudding - AMAZING!

I have been toying with the idea of chia seeds for awhile now.  Truth be told, I am usually reluctant to try new foods.  I bought some at Whole Foods about two months ago.  I was home today from work because I have been fighting my yearly start of fall cold.  And I wanted a little something sweet and am out of frozen bananas.  So, I googled some recipes.  Thank god for Paleo Parents and their recipe because I think my life is changed for good.  For once, I don't even feel the need to tweak the recipe (although I am going to play with some flavors in the next few weeks) and I wanted you guys to have it immediately so I have no pictures.

Vanilla Cinnamon Chia Pudding

13.5 ounce can of coconut milk (try to pick a nice, thick, creamy one - I used Trader Joe's Coconut Cream)

(Picture credit to the Cyclist's Wife)

4 Tbsp give or take of honey
1 tsp vanilla (I misread this and actually used a tablespoon but I love vanilla flavor)
1/4 tsp cinnamon
1/4 cup chia seeds

I used a mason jar as the PP's suggested.

I started by adding the honey, vanilla, cinnamon and coconut milk and mixing very very well.

Here's where the jar is handy, as they point out, because you can simply pop the lid on and shake away.  Maybe do a little kitchen dance and get in some cardio.

Next, add the chia seeds and shake again.

Chill for an absolute bare minimum of 30 minutes (I did mine for 2 hours and honestly, it could be colder!).

Enjoy!

This is so freaking good!

Julie

Friday, August 30, 2013

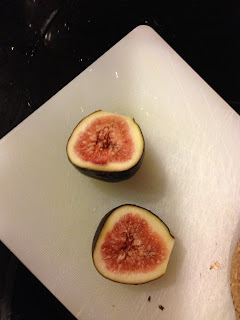
Paleo Bacon Wrapped, Fig Stuffed Chicken - YUM!

Those of you who like the Working Paleo page on Facebook know that I bought some fresh figs at Whole Foods and was somewhat confused as to what I should do with them a few weeks back.  So I did some googling and some Pinterest searching and got lots and lots of results for desserts.  I wanted a main course, something savory and delicious.  And chicken breast was on sale (although I plan on trying a version of this with a pork tenderloin)..... So, bacon wrapped, fresh fig and mushroom stuffed chicken breasts it is!  After a few tries, I reached perfection.


Recipe

2 boneless, skinless chicken breasts
6 fresh figs
1 portabella mushroom cap
12 slices of bacon

-Prior to covering your cutting board in raw chicken juice, slice your figs and mushrooms into appropriate size and shape for rolling.  I love the shape of the fig so I just slice each whole one thinly.  The mushrooms I cut to about the size of sugar cubes.


-Set aside
-Preheat oven to 350 degrees
-Slice each chicken breast horizontally creating 2-3 cross sections of breast (this is a confusing description but check out the pictures for clarity)


-Place each piece of chicken breast under a piece of saran wrap and pound thing with a meat tenderizing hammer thingie (so therapeutic!)


-Each roll consists of two pieces of bacon laid side by side, thin piece of chicken on top, figs and mushrooms spread evenly over one half of the chicken


-Roll the whole thing starting with the portion where the figs and shrooms are
-The bacon will likely be longer than the chicken breast but that is ok - it will help hold the whole thing together
-Place each roll in a glass baking dish with the seam on the bottom


-Space the rolls around 1/2 inch apart.  they will shrink as they cook so no need to get crazy spreading them apart
-Bake at 350 for 40 minutes or until the bacon looks well cooked


The first time I made this, I added diced red peppers to the mix too but hubby didn't like those.  I also made it with just the figs but it seemed tastier with the mushrooms.  I find the best fig to chicken ratio is one whole fig per piece of chicken.  Fresh figs are in season RIGHT NOW so head to Trader Joe's or Whole Foods immediately ;)

Enjoy!

Tuesday, August 27, 2013

I Hate Rotten Strawberries!

Over the last few years, I noticed that strawberries get rotten really quickly after I purchase them.  I don't know if it is because it takes them longer to get from the field to the store or what.  But, we seldom get to eat a whole container before they are no good.


A few tips and tricks to help your strawberries last longer:

(1) Set aside some time post grocery shopping to wash all of your fruit in a mixture of vinegar and water.  I do about one cup of vinegar to three cups of cool water.  It will save you time in the end because you won't have to wash again.  I fill up a big bowl and plop things in, swish them around and then rinse in the sink.

(2) After I wash my strawberries, I immediately sort through them.  Ones that are already inedible go right in the trash because they can get moldy and the mold and spread.

(3) After throwing out the completely bad ones, I cut up the rest.  As you know, some are borderline.  Those I cut and throw in a freezer bag and freeze for smoothies.  There are two ways to freeze strawberries.  (a) Throwing them in the freezer bag and putting them in the freezer; or (b) Placing each one on a baking sheet and freezing them there - once frozen, transfer to a bag or container.  The beauty of method (b) is that the berries don't clump together and you can more easily measure them if following a recipe.  It is completely a lifestyle choice.  Since I am not huge on measuring or time, I do (a).


(4) The remaining perfectly ripe berries go in an airtight container with a paper towel.  The paper towels helps absorb any excess moisture.  I try and keep them on a low shelf for the little guy to help himself.


Friday, August 16, 2013

Worth the Wait Chocolate Cake

So, I know it has been awhile since my last post.  Lots happening in WP world: quit one job, started another (getting settled has consumed the last month), end of school and birthday for the little man.  Whew, things are finally settling into a new routine.

But little man's bday and parents visiting was inspiring in the baking sense and it was a win.  Even my dad who is very resistant to all things Paleo gave this cake a thumbs up.  It is rich and chocolately and just amazing.  The cake recipe originated from these brownie bites by Slimpalate.  And then the frosting started with this recipe by crossfitpulse.  And then I started tweaking.  Because we all know I love to tweak recipes!

Voila, enjoy!

Chocolate Cake with Chocolate Ganache Frosting
(This recipe makes a one layer, 9" diameter cake - double it for two layers and let me know how it comes out!)

Cake

1 cup almond flour
1/2 cup cocoa powder (I just discovered Hershey's has one that is 100% cacao and much cheaper)
1/4 tsp baking soda
Pinch of sea salt

1/2 cup coconut oil, melted (in the summer, my coconut oil is pretty much melted from the jar but 10-15 seconds in the microwave should take care of it the rest of the year)
1/2 cup honey (the recipe as written calls for Stevia plus water but I am not sure how I feel about Stevia yet so better to go all natural right?)
3 eggs
1 tsp vanilla extract (I have also done with recipe with 1/2 tsp vanilla extract and 1/2 tsp orange extract - SUPER YUM)

-Preheat the oven to 350 degrees.
-Using either coconut oil spray from Trader Joe's or some melted coconut oil, grease your cake pan liberally.
-Combine all dry ingredients.
-Combine all wet ingredients.
-Pour the wet ingredients into the dry and stir thoroughly.  If you don't feel like stirring a lot (because otherwise the almond flour clumps up), throw the whole mixture in the blender (I love my Ninja!) or food processor and zap for a minute or so.
-Pour into cake pan - no need to leave much room at the top as it doesn't expand much.
-Cook for approximately 35 minutes or until a knife or toothpick comes out clean.  Ovens vary so use your judgment here.
 -Let cool in the pan and then flip it out onto a plate

If you don't feel like making the frosting below, you can also mix some almond butter with a bit of honey or maple syrup and spread on top.  Make sure to eat right away though because it doesn't hold up long and slides off!  Another variation is to add some Enjoy Life chocolate chunks.  I get mine at Whole Foods or Stop and Shop but they are apparently also available on Amazon.  S&S here has them for $4.69 a bag - YIKES!

Chocolate Ganache Frosting

1 bag Enjoy Life chocolate chips or chunks
1/3 cup coconut oil
1/2 tbs vanilla extract (can add the orange or raspberry extract here too - just change to 1/4 tbs each)
2 heaping tbs of almond butter (I used a big ass kitchen spoon because I love the chocolate/almond butter flavor combo)

-In a shallow pan (I suppose you could use a double boiler but it wasn't necessary), combine the "chocolate" chips, coconut oil and almond butter over low low heat.
-Stir frequently until the entire mixture is melted and combined.
-Add the vanilla extract and continue stirring until combined well.
-Pour into a glass bowl and let cool a bit.
-Spread over your cake and then refrigerate the whole lot for about 30 minutes.

Ok, so here's the catch with the icing - it gets very hard if you refrigerate it too long.  But it melts back down pretty quickly if left on the counter or zapped in the microwave on LOW for 30 seconds or so.  You need to be careful about burning and separating the chocolate though so probably best to leave it right away.  When you are ready to serve the cake, take it out about 10 minutes before you need to cut it to return the frosting to a cuttable texture.

Questions?  Email me or leave me a message on the Working Paleo Facebook page (where you can also find a picture of this fab cake)!

Julie

Wednesday, May 22, 2013

Simple Paleo Jerky

***I wanted to get this posted before I forgot!  I will be back to add pictures later tonight!***

Since I discovered this recipe, beef jerky has become a staple of my paleo day.  Before, I wasn't at all tempted by the plastic packaged stuff in the store.  Let's face it, it is marketed to men and the idea of unrefrigerated meat sitting in a bag for weeks on end in a store isn't so appetizing.  But I am psyched to eat it if I made it myself.

So, depending on the meat you choose, it can get pricey.  I bought flank steak that wasn't on sale the first time I made jerky because I wanted to try it.  It was around $8 a pound.  Add the coconut aminos which are around $12/bottle (and you use half a bottle per 2-3 lbs of meat) and the spices and it becomes one of the pricier snacks.  But totally worth it as a treat or if you see a good deal on meat (I recently got an organic rib eye that was discounted because it was on its last "marketable" day for $2/lb and it made GREAT jerky!).

The "best" cuts for it according to my extensive googling are london broil, top round or flank steak.  Basically that is because they are very lean.  But as long as you don't mind a little extra elbow grease, any cut will work provided you trim off any visible fat.  Leaving fat on the meat makes it take longer to cook and increases the chances it will become rancid (yuck!) after a few days.  Plus, it isn't good for you anyways.....

Recipe

3 lbs lean beef (place in freezer for an hour or two for easier thin slicing)
3/4 cup coconut aminos (I have cut this down a bit when using spicier spices and it still works.  Plus aminos are expensive!)
1/4 cup water (increase the water in an equal ratio to the aminos you remove if you do)
3 teaspoons granulated or minced garlic (I prefer fresh minced but powered will work fine)
1 tbs dried ginger*
1/2 to 1 tbs fresh cracked black pepper
1 tbs sea salt

Slice beef very thinly, approximately 1/4 inch thick and across the grain.
Place big in a large glass bowl or zipper bag.
Premix all of the above ingredients.
Add the liquid to the meat bag and mix well (I prefer the bag because I can squish it around easily)
Marinate for at least 4 hours (I prefer at least overnight and have left it as long as 48 hours).

Dehydrator: Place in dehydrator for 4 to 5 hours at 160 degrees or until it looks done.

Oven: Place strips on cookie sheets (metal) with no overlapping.  Cook on 170 degrees for 4 to 5 hours (might be longer if your meat is thicker and dependent on your oven so leave yourself extra time just in case).  Leave the oven door cracked open (you can prop with a wooden spoon).

*Note: I don't use the ginger.  We like our jerky spicier so I used one tablespoon either Jamaican or Indian style curry powder.  Even my coworkers who don't love curry love the jerky with curry so try it!  I am eating some right now....

Saturday, May 18, 2013

Curry Bacon Brussel Sprouts

It really bothers me that I have no idea if it is "brussel" or "brussels". Googling produces results for both and I prefer to use proper English. Regardless these sprouts are divine!

I have a bit of an obsession going with curry. The curry I am using was purchased on our trip to Grand Cayman last November and is a Jamaican style yellow powder. I am sure the recipe would also work well with an Indian style yellow curry as they are very similar. I will have to try it out with Thai before I give that my blessing though!

Recipe

Brussel(s) sprouts, cleaned - 2 cups
3 tbs olive oil
1 tbs curry powder
1 tsp minced garlic
3-4 strips bacon

Preheat the oven to 375 degrees.

Mix the olive oil and curry together until well combined.

Toss the sprouts in the garlic and then toss them in the oil mixture (right in the dish you are going to roast them in so you don't lose a drop of yummy curry oil!).

Arrange in a tightly packed single layer in the baking dish.

Drape the slices of raw bacon over the top.

Pop in the oven and cook until both the bacon is cooked and sprouts look a bit browned and crispy (30-40 minutes depending on your oven).

Remove from oven and let cool for a few minutes. Carefully (ouch, it's hot!) break the bacon into bite size pieces and mix it into the sprouts.

Serve and enjoy!

Thursday, May 16, 2013

Paleo Friendly Italian Dressing

I posted this recipe the other day on the Working Paleo Facebook page.  Hubby and I love it and it is so much cheaper than the commercially prepared dressings.  I have stored it in the fridge for about a month now without an issue.  I make huge batches (quadruple the below recipe) and fill several jars so it is ready to go for salads and marinades.  I substituted a little crushed mustard seed for the mustard and even left it out completely in one batch and it was still fabulous!


Recipe

1 cup olive oil
1 cup red wine vinegar (can substitute other vinegars and mix in some lemon juice too)
2 1/2 tsp garlic powder (I added minced garlic instead)
1 tsp onion powder or dried minced onion
2 1/2 tsp dried oregano
2 1/2 dried basil (I have used fresh as well)
2 tsp sea salt
2 tsp black pepper
2 tsp dried or prepared mustard


Combine all ingredients and shake well.  Store in a jar with an airtight seal either in the fridge or at room temperature.  Keep in mind that the oil and vinegar will separate so it will need to be shaken prior to use and, if refrigerated, might need too warm up a bit.