Wednesday, September 11, 2013

Paleo Chia Pudding - AMAZING!

I have been toying with the idea of chia seeds for awhile now.  Truth be told, I am usually reluctant to try new foods.  I bought some at Whole Foods about two months ago.  I was home today from work because I have been fighting my yearly start of fall cold.  And I wanted a little something sweet and am out of frozen bananas.  So, I googled some recipes.  Thank god for Paleo Parents and their recipe because I think my life is changed for good.  For once, I don't even feel the need to tweak the recipe (although I am going to play with some flavors in the next few weeks) and I wanted you guys to have it immediately so I have no pictures.

Vanilla Cinnamon Chia Pudding

13.5 ounce can of coconut milk (try to pick a nice, thick, creamy one - I used Trader Joe's Coconut Cream)

(Picture credit to the Cyclist's Wife)

4 Tbsp give or take of honey
1 tsp vanilla (I misread this and actually used a tablespoon but I love vanilla flavor)
1/4 tsp cinnamon
1/4 cup chia seeds

I used a mason jar as the PP's suggested.

I started by adding the honey, vanilla, cinnamon and coconut milk and mixing very very well.

Here's where the jar is handy, as they point out, because you can simply pop the lid on and shake away.  Maybe do a little kitchen dance and get in some cardio.

Next, add the chia seeds and shake again.

Chill for an absolute bare minimum of 30 minutes (I did mine for 2 hours and honestly, it could be colder!).

Enjoy!

This is so freaking good!

Julie

Friday, August 30, 2013

Paleo Bacon Wrapped, Fig Stuffed Chicken - YUM!

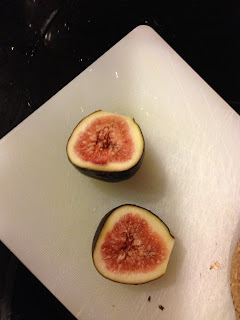
Those of you who like the Working Paleo page on Facebook know that I bought some fresh figs at Whole Foods and was somewhat confused as to what I should do with them a few weeks back.  So I did some googling and some Pinterest searching and got lots and lots of results for desserts.  I wanted a main course, something savory and delicious.  And chicken breast was on sale (although I plan on trying a version of this with a pork tenderloin)..... So, bacon wrapped, fresh fig and mushroom stuffed chicken breasts it is!  After a few tries, I reached perfection.


Recipe

2 boneless, skinless chicken breasts
6 fresh figs
1 portabella mushroom cap
12 slices of bacon

-Prior to covering your cutting board in raw chicken juice, slice your figs and mushrooms into appropriate size and shape for rolling.  I love the shape of the fig so I just slice each whole one thinly.  The mushrooms I cut to about the size of sugar cubes.


-Set aside
-Preheat oven to 350 degrees
-Slice each chicken breast horizontally creating 2-3 cross sections of breast (this is a confusing description but check out the pictures for clarity)


-Place each piece of chicken breast under a piece of saran wrap and pound thing with a meat tenderizing hammer thingie (so therapeutic!)


-Each roll consists of two pieces of bacon laid side by side, thin piece of chicken on top, figs and mushrooms spread evenly over one half of the chicken


-Roll the whole thing starting with the portion where the figs and shrooms are
-The bacon will likely be longer than the chicken breast but that is ok - it will help hold the whole thing together
-Place each roll in a glass baking dish with the seam on the bottom


-Space the rolls around 1/2 inch apart.  they will shrink as they cook so no need to get crazy spreading them apart
-Bake at 350 for 40 minutes or until the bacon looks well cooked


The first time I made this, I added diced red peppers to the mix too but hubby didn't like those.  I also made it with just the figs but it seemed tastier with the mushrooms.  I find the best fig to chicken ratio is one whole fig per piece of chicken.  Fresh figs are in season RIGHT NOW so head to Trader Joe's or Whole Foods immediately ;)

Enjoy!

Tuesday, August 27, 2013

I Hate Rotten Strawberries!

Over the last few years, I noticed that strawberries get rotten really quickly after I purchase them.  I don't know if it is because it takes them longer to get from the field to the store or what.  But, we seldom get to eat a whole container before they are no good.


A few tips and tricks to help your strawberries last longer:

(1) Set aside some time post grocery shopping to wash all of your fruit in a mixture of vinegar and water.  I do about one cup of vinegar to three cups of cool water.  It will save you time in the end because you won't have to wash again.  I fill up a big bowl and plop things in, swish them around and then rinse in the sink.

(2) After I wash my strawberries, I immediately sort through them.  Ones that are already inedible go right in the trash because they can get moldy and the mold and spread.

(3) After throwing out the completely bad ones, I cut up the rest.  As you know, some are borderline.  Those I cut and throw in a freezer bag and freeze for smoothies.  There are two ways to freeze strawberries.  (a) Throwing them in the freezer bag and putting them in the freezer; or (b) Placing each one on a baking sheet and freezing them there - once frozen, transfer to a bag or container.  The beauty of method (b) is that the berries don't clump together and you can more easily measure them if following a recipe.  It is completely a lifestyle choice.  Since I am not huge on measuring or time, I do (a).


(4) The remaining perfectly ripe berries go in an airtight container with a paper towel.  The paper towels helps absorb any excess moisture.  I try and keep them on a low shelf for the little guy to help himself.


Friday, August 16, 2013

Worth the Wait Chocolate Cake

So, I know it has been awhile since my last post.  Lots happening in WP world: quit one job, started another (getting settled has consumed the last month), end of school and birthday for the little man.  Whew, things are finally settling into a new routine.

But little man's bday and parents visiting was inspiring in the baking sense and it was a win.  Even my dad who is very resistant to all things Paleo gave this cake a thumbs up.  It is rich and chocolately and just amazing.  The cake recipe originated from these brownie bites by Slimpalate.  And then the frosting started with this recipe by crossfitpulse.  And then I started tweaking.  Because we all know I love to tweak recipes!

Voila, enjoy!

Chocolate Cake with Chocolate Ganache Frosting
(This recipe makes a one layer, 9" diameter cake - double it for two layers and let me know how it comes out!)

Cake

1 cup almond flour
1/2 cup cocoa powder (I just discovered Hershey's has one that is 100% cacao and much cheaper)
1/4 tsp baking soda
Pinch of sea salt

1/2 cup coconut oil, melted (in the summer, my coconut oil is pretty much melted from the jar but 10-15 seconds in the microwave should take care of it the rest of the year)
1/2 cup honey (the recipe as written calls for Stevia plus water but I am not sure how I feel about Stevia yet so better to go all natural right?)
3 eggs
1 tsp vanilla extract (I have also done with recipe with 1/2 tsp vanilla extract and 1/2 tsp orange extract - SUPER YUM)

-Preheat the oven to 350 degrees.
-Using either coconut oil spray from Trader Joe's or some melted coconut oil, grease your cake pan liberally.
-Combine all dry ingredients.
-Combine all wet ingredients.
-Pour the wet ingredients into the dry and stir thoroughly.  If you don't feel like stirring a lot (because otherwise the almond flour clumps up), throw the whole mixture in the blender (I love my Ninja!) or food processor and zap for a minute or so.
-Pour into cake pan - no need to leave much room at the top as it doesn't expand much.
-Cook for approximately 35 minutes or until a knife or toothpick comes out clean.  Ovens vary so use your judgment here.
 -Let cool in the pan and then flip it out onto a plate

If you don't feel like making the frosting below, you can also mix some almond butter with a bit of honey or maple syrup and spread on top.  Make sure to eat right away though because it doesn't hold up long and slides off!  Another variation is to add some Enjoy Life chocolate chunks.  I get mine at Whole Foods or Stop and Shop but they are apparently also available on Amazon.  S&S here has them for $4.69 a bag - YIKES!

Chocolate Ganache Frosting

1 bag Enjoy Life chocolate chips or chunks
1/3 cup coconut oil
1/2 tbs vanilla extract (can add the orange or raspberry extract here too - just change to 1/4 tbs each)
2 heaping tbs of almond butter (I used a big ass kitchen spoon because I love the chocolate/almond butter flavor combo)

-In a shallow pan (I suppose you could use a double boiler but it wasn't necessary), combine the "chocolate" chips, coconut oil and almond butter over low low heat.
-Stir frequently until the entire mixture is melted and combined.
-Add the vanilla extract and continue stirring until combined well.
-Pour into a glass bowl and let cool a bit.
-Spread over your cake and then refrigerate the whole lot for about 30 minutes.

Ok, so here's the catch with the icing - it gets very hard if you refrigerate it too long.  But it melts back down pretty quickly if left on the counter or zapped in the microwave on LOW for 30 seconds or so.  You need to be careful about burning and separating the chocolate though so probably best to leave it right away.  When you are ready to serve the cake, take it out about 10 minutes before you need to cut it to return the frosting to a cuttable texture.

Questions?  Email me or leave me a message on the Working Paleo Facebook page (where you can also find a picture of this fab cake)!

Julie

Wednesday, May 22, 2013

Simple Paleo Jerky

***I wanted to get this posted before I forgot!  I will be back to add pictures later tonight!***

Since I discovered this recipe, beef jerky has become a staple of my paleo day.  Before, I wasn't at all tempted by the plastic packaged stuff in the store.  Let's face it, it is marketed to men and the idea of unrefrigerated meat sitting in a bag for weeks on end in a store isn't so appetizing.  But I am psyched to eat it if I made it myself.

So, depending on the meat you choose, it can get pricey.  I bought flank steak that wasn't on sale the first time I made jerky because I wanted to try it.  It was around $8 a pound.  Add the coconut aminos which are around $12/bottle (and you use half a bottle per 2-3 lbs of meat) and the spices and it becomes one of the pricier snacks.  But totally worth it as a treat or if you see a good deal on meat (I recently got an organic rib eye that was discounted because it was on its last "marketable" day for $2/lb and it made GREAT jerky!).

The "best" cuts for it according to my extensive googling are london broil, top round or flank steak.  Basically that is because they are very lean.  But as long as you don't mind a little extra elbow grease, any cut will work provided you trim off any visible fat.  Leaving fat on the meat makes it take longer to cook and increases the chances it will become rancid (yuck!) after a few days.  Plus, it isn't good for you anyways.....

Recipe

3 lbs lean beef (place in freezer for an hour or two for easier thin slicing)
3/4 cup coconut aminos (I have cut this down a bit when using spicier spices and it still works.  Plus aminos are expensive!)
1/4 cup water (increase the water in an equal ratio to the aminos you remove if you do)
3 teaspoons granulated or minced garlic (I prefer fresh minced but powered will work fine)
1 tbs dried ginger*
1/2 to 1 tbs fresh cracked black pepper
1 tbs sea salt

Slice beef very thinly, approximately 1/4 inch thick and across the grain.
Place big in a large glass bowl or zipper bag.
Premix all of the above ingredients.
Add the liquid to the meat bag and mix well (I prefer the bag because I can squish it around easily)
Marinate for at least 4 hours (I prefer at least overnight and have left it as long as 48 hours).

Dehydrator: Place in dehydrator for 4 to 5 hours at 160 degrees or until it looks done.

Oven: Place strips on cookie sheets (metal) with no overlapping.  Cook on 170 degrees for 4 to 5 hours (might be longer if your meat is thicker and dependent on your oven so leave yourself extra time just in case).  Leave the oven door cracked open (you can prop with a wooden spoon).

*Note: I don't use the ginger.  We like our jerky spicier so I used one tablespoon either Jamaican or Indian style curry powder.  Even my coworkers who don't love curry love the jerky with curry so try it!  I am eating some right now....

Saturday, May 18, 2013

Curry Bacon Brussel Sprouts

It really bothers me that I have no idea if it is "brussel" or "brussels". Googling produces results for both and I prefer to use proper English. Regardless these sprouts are divine!

I have a bit of an obsession going with curry. The curry I am using was purchased on our trip to Grand Cayman last November and is a Jamaican style yellow powder. I am sure the recipe would also work well with an Indian style yellow curry as they are very similar. I will have to try it out with Thai before I give that my blessing though!

Recipe

Brussel(s) sprouts, cleaned - 2 cups
3 tbs olive oil
1 tbs curry powder
1 tsp minced garlic
3-4 strips bacon

Preheat the oven to 375 degrees.

Mix the olive oil and curry together until well combined.

Toss the sprouts in the garlic and then toss them in the oil mixture (right in the dish you are going to roast them in so you don't lose a drop of yummy curry oil!).

Arrange in a tightly packed single layer in the baking dish.

Drape the slices of raw bacon over the top.

Pop in the oven and cook until both the bacon is cooked and sprouts look a bit browned and crispy (30-40 minutes depending on your oven).

Remove from oven and let cool for a few minutes. Carefully (ouch, it's hot!) break the bacon into bite size pieces and mix it into the sprouts.

Serve and enjoy!

Thursday, May 16, 2013

Paleo Friendly Italian Dressing

I posted this recipe the other day on the Working Paleo Facebook page.  Hubby and I love it and it is so much cheaper than the commercially prepared dressings.  I have stored it in the fridge for about a month now without an issue.  I make huge batches (quadruple the below recipe) and fill several jars so it is ready to go for salads and marinades.  I substituted a little crushed mustard seed for the mustard and even left it out completely in one batch and it was still fabulous!


Recipe

1 cup olive oil
1 cup red wine vinegar (can substitute other vinegars and mix in some lemon juice too)
2 1/2 tsp garlic powder (I added minced garlic instead)
1 tsp onion powder or dried minced onion
2 1/2 tsp dried oregano
2 1/2 dried basil (I have used fresh as well)
2 tsp sea salt
2 tsp black pepper
2 tsp dried or prepared mustard


Combine all ingredients and shake well.  Store in a jar with an airtight seal either in the fridge or at room temperature.  Keep in mind that the oil and vinegar will separate so it will need to be shaken prior to use and, if refrigerated, might need too warm up a bit.


Tuesday, May 7, 2013

Paleo Ketchup

When I first started eating paleo, I didn't even think about the condiments I use as being "bad".  Because, honestly, I don't really use a lot of condiments.  But hubby and the kiddo do.  And when I looked at the label for our ketchup and saw how much sugar it had in it, I decided to make my own.  So here's a super simple recipe that I found on Pinterest for super easy paleo ketchup!  I have no idea who Ryan Wilder is but his ketchup is pretty great.  I am going to tweak it a bit for next time as hubby's comment was that it was "too tomatoey" - are you laughing too?

Recipe

12 oz tomato paste
1.5 cups water
2 tbsp vinegar
1/2 tsp garlic powder (in my tweaks, I think I am going to up this and see how it goes - stay tuned!)
1/2 tsp onion powder (more of this too!)
1/4 tsp allspice

Put all of the above in a sauce pan and heat thoroughly, stirring frequently and well.  Allow to simmer for a few minutes and then pour into a glass container.

I have a bunch of 32 oz mason jars for this type of thing (ordered on Amazon) that work perfectly.  The one criticism I have of this (and it isn't really a criticism) is that it separates and gets quite "chunky" or lumpy.  Stirring well before use remedies this and, of course, using all natural ingredients generally means things don't emulsify as well.  So, the positives outweigh the negatives!  This ketchup is awesome on the paleo meatloaf that I posted on Facebook (here soon) as well as sweet potato "chips" and almost anything else.

Enjoy!

Thursday, April 25, 2013

Rough Week

This has been a rough week or so for me. Boston is my home city. A friend yesterday told me that I positively glow when I talk about Boston and all the things to see and do while there. The prospect of returning someday is what keeps me going when times are tough in Connecticut.

And of all the things about Boston that I love, I love the Boston Marathon and Patriot's Day the most. For those of you not from Massachusetts, the idea of the marathon and an extra holiday is hard to explain. It is like Christmas combined with Homecoming all in the spring time. Often it is the first day I was outside in short sleeves after a long winter. Which usually meant my first sunburn of the year.

If I had to work, I would inevitably figure out a way to duck out early to go BBQ and have fun on Beacon Street with my friends while we enjoyed a beverage and cheered on the runners. There would be skewers of meat and veggies on the grills which were lit and churning out tasty treats right on the sidewalks. We always knew someone who was running and usually at least three or four people. Often they were running for a charity and we had donated so could track their progress on the course.

The marathon meant spending a relaxing day with my boyfriend then husband enjoying the sunshine and camaraderie of fellow Bostonians. And listening to the Red Sox game on the radio while we ate and watched the runners. Nothing more American than sunshine, BBQ and baseball enjoyed with friends.

So, when someone tried to destroy that, I took it a little bit hard. I was sad and angry and so very very worried during those first few hours that someone I know might have been killed or injured. All this on the heels of Newtown, only a few minutes away from my current hometown. And then it didn't matter if I knew anyone that was hurt because every single person that was hurt or worse became a friend of Boston. As a city, Boston stood up and said "NO!" An overwhelming show of support for the victims, their families and the first responders who risked their lives. The people of Boston and the surrounding communities banded together and were joined by people around the country and across the world saying "No! We aren't going to let this happen here, the birthplace of the United States."

And we didn't. And next year, I will pretend that I am still in Massachusetts and I will skip out of work on Patriot's Day and pack up my son and take him to his first Boston Marathon.

Sunday, April 14, 2013

Fritatta of Paleo Love

One of the first recipes I came up with on my own after hubby and I started our Paleo journey was a gorgeous and delicious fritatta.


Doesn't it look good?  Ok, so maybe it isn't the most attractive dish in the world but it was DELICIOUS.  And really really filling.  It made enough for us for dinner one night and lunch each the following day and we were stuffed.  Plus it is absolutely packed with vegetables.

This recipe makes a huge amount of food but if you cut it in half, this fritatta would likely fit into a pie plate and be a bit thinner.  I made it in a Corningware dish that is fairly deep (4" or so) - you know, the white ridged baking dishes with the clear glass tops?  It is very quiche like but no cream or cheese or crust so I hesitate to call it a quiche!

Recipe

A dozen eggs
1 lb loose breakfast sausage
5 strips bacon, cooked crispy
1 onion, chopped
1 zucchini, halved and sliced
1 summer squash, halved and sliced
2 cups broccoli
1 tbsp garlic, minced or chopped
Salt and pepper to taste
Olive oil

In a fairly deep saute pan, saute the onion and garlic in olive oil for about five minutes.

Add the sausage and cook until sausage is well browned.

While the sausage, etc. is cooked, crack your eggs directly into the baking dish and add your cooked bacon.    Mix well (breaks all egg yolks, etc.)  Set it aside.

Once the sausage is sufficiently browned, add your zucchini and summer squash to the pan and stir well and frequently, allowing it to cook for about five minutes.

Add your broccoli to the pan and stir well and frequently, allowing it to cook for three minutes.  In order to get the veggies to cook up quickly, you may need to cover the pan depending on your pans and cooking source (gas or electric).  I usually cover because my pans don't heat evenly and we have an electric stove.

Remove the sausage and vegetable mix from the heat and allow it to cool a bit - around 10 minutes or so.  Preheat the oven to 375 degrees while you are waiting.

Once cooled, add to the egg mixture and stir well.

Pop in the oven for thirty minutes or until the center is cooked through (do the clean knife test).

The leftovers of this dish (if there are any!) reheat really well in the microwave.  Enjoy!

Saturday, April 13, 2013

Cooking Paleo

I have been trying out a lot of new recipes lately, both my own creations and ones I find on the internet and tweak a bit.  Some ideas are born of desperation and the few ingredients left at the end of the week and others to find healthier solutions that even my three year old will eat.

Just a little preview of what's to come this week and next for recipes:

Homemade ketchup (I made it but want to try it first before I share it.  It could be gross.)

Homemade italian salad dressing (see above)

Curried brussel sprouts with bacon

Fritatta full of Paleo love (a.k.a. meat and veggies)

Quick chicken salad extraordinaire (this was so amazingly good for something thrown together for a 9 p.m. dinner)

Paleo "ice cream" (Trying a few different flavors out over the weekend.  Planning to share the hits and misses!)

Also, check out Working Paleo on Facebook for daily status update and a great community of people sharing and working hard together to be healthy!


Wednesday, April 10, 2013

Paleo Snacks

I admit, I have been having some issues with paleo friendly snacks.  I come home from work hungry and have a hard time finding something to grab and munch on while I cook dinner for the little guy.  So I fall into the trap of paleo convenience foods like those plaintain chips from Whole Foods that I mentioned in my last post.  And since I am not only eating paleo for health but also to lose weight, eating a lot of fruit or nuts isn't recommended.  There goes my yummy dates with almond butter.....

So, here are a few things on my "good" list from this week:

Sliced fresh tomato - It is kind of fun to grab a tomato and go since I can cut it up at work.

Sliced cucumber - I bought four over the weekend and peeled and sliced ahead so I can grab them in the morning for work.

Sliced peppers - Same as the cucumbers, I bought a variety of colors of peppers over the weekend and pre-sliced them as a grab and go snack.

Carrot sticks - Whole Foods sells these already peeled and cut and packed in water.  Genius!  Of course, it is way more expensive but sometimes it is worth it to pay for convenience.

Hard boiled eggs - Not my favorite because I really prefer my eggs warm but good in a pinch.

Bacon - Well, I do love bacon.  And you can pop it in the microwave for five minutes and it is ready to go.

I need some other suggestions.  A good friend is going to try making her own beef jerky with coconut aminos to make it paleo friendly.  I am waiting to see how that goes before I try it myself.

Any other suggestions?  Let me know!

Tuesday, April 9, 2013

Whole Foods really does mean Whole Paycheck

I love Whole Foods.  They have everything a person eating Paleo could possibly need.  I bought a variety of new things to try including cashew based gelato (review to come!) and plaintain chips.

My groceries didn't even fill three bags completely.  $113 and change!  Yikes.  Granted, I bought really high quality cacao powder and the little guy wanted this place mat and some chocolate and a billion other things so that definitely jacked up the cost (and reinforced my desire to go by myself next time).


But I did find these delicious little snacks.  To be eaten sparingly of course.

Friday, April 5, 2013

Hate Spinach?

So, I realize that not everyone like spinach.  But they may have been intrigued by this recipe.  So I thought I would give the same thing a shot with brussel sprouts.  Guess what?  Delicious.  I will be trying a few other vegetables over the next few weeks and will let you all know how it goes!


Wednesday, April 3, 2013

Braised Short Ribs

Not only did hubby and I share a cow with a few other families, but we also are participating in a winter meat farm share with Truelove Farms.  We had beef short ribs from both.  I had tried making short ribs from a Food Network recipe several years ago and completely struck out so I was leery to try again.  This recipe is definitely one for a weekend and isn't quick like many of the others I post but it was delicious.  I found it here and made it more Paleo friendly.  If you are avoiding alcohol altogether, you might try some unsweetened grape or apple juice for your braising liquid but not sure how that will taste (let me know if you try it!) or some beef broth.

 Recipe

8 beef short ribs (recipe says about 6 ounces each but mine were wacky sized and it all worked fine)
2/3 cup almond flour
2 tbsp onion powder
3 tbsp salt (I used sea salt which is less salty so I upped this to 4 tbsp)
2 tbsp black ground pepper
4 chopped/diced garlic cloves
4 tbsp olive oil
2 onions, chopped
2 cups of chopped carrots
2 cups organic red wine
2 sprigs fresh rosemary with the pieces picked off the stem
2 cans of either low sodium chicken broth or beef broth (don't open both - just have on hand as you may or may not need that much depending on your pan)

Preheat oven to 300 degrees

In a shallow dish or bowl (I used a glass pie plate and it worked PERFECTLY), combine the almond flour, salt, pepper and onion powder.


 Dredge each beef rib through the the dry mixture and shake off the excess.  Shake fairly well as almond flour absorbs moisture more readily than regular flour.

Heat olive oil and garlic in a large skillet.

Cook ribs on medium high heat until all sides are browned.  Because it is easier and I didn't have a pan large enough, I did two to three ribs at a time.


Place the browned ribs in an oven safe baking dish.


Reduce the heat to medium low and add the carrots and onions to the skillet and cook until they are soft and slightly browned.

Add the red wine and rosemary to the skillet and simmer until the liquid reduces by about one half.

Pour the mixture carefully over the ribs.

Add broth until the ribs are just covered by the liquid.  I failed to plan ahead on this step and my baking dish wasn't deep enough so, PLAN AHEAD.  The liquid needs to cover the meat.

Braise covered in the oven for three hours or until the meat is literally falling off of the rib (it might take longer than three hours or shorter - I would start checking them at the 2.5 hour mark).

Once done, take the ribs out and you can simmer the remaining liquid on the stove top for a "gravy" of sorts. I just served it "as is" on the side and it was delicious, especially the carrots!


Tuesday, April 2, 2013

Party Pleaser - Zucchini Hummus

When you think about hummus (if you think about it - I do!), you generally think chick peas.  Which are a major Paleo no-no.  But the rest of the ingredients in hummus are all healthy and Paleo friendly.  So what the heck do I dip my vegetables in?

And then, on Pinterest (I am an addict, follow me!), I came across this recipe from SkinnyMs.  And I gave it a shot in my Ninja blender.  Party perfection!


Recipe

(I doubled the recipe and it made way more than I needed!)

2 medium zucchini, peeled and chopped
1/2 cup tahini
1/2 cup lemon juice (you can up this if you like a more lemony flavored hummus)
1/2 cup olive oil
3 garlic cloves (next time I am going to roast these first and then make the recipe)
1 1/2 tsp cumin
Salt and pepper to taste

Throw it all in a blender and food processor and mix until smooth.  Serve with raw veggies for dipping!


Saturday, March 30, 2013

Weight Loss Update

So, if you read my first post, you know that hubby and I started this way of eating to help with weight loss and to also feel better in general.  Hubby's blood sugar was a bit high and I have tons of allergy issues centered around pollen and fruit pollen as well as dairy plus cold and lung issues related to recent bouts of bronchitis and flu related pneumonia.  We did some reading and research and talking to friends who had tried Paleo and figured it was worth a shot.

So how are we doing?

With Hubby, blood sugar isn't something we can really measure except from doctor appointment to doctor appointment without buying a fancy monitor thing.  So, we aren't sure on that front. But he reports that he generally feels better and has more energy.  Plus he has lost about 5 pounds since we started on March 3rd.

For me, I am scared to try eating the fruits I have issues with but I will eventually.  It creates somewhat of a problem to be allergic to fruit when I am eating this way because it limits what I am able to snack on.  Total bummer.  I have issues with apples, peaches, pears, nectarines, plums, cherries and blueberries.  Dairy also does a bad things to my stomach sometimes.  Since cutting dairy out, I haven't had any of those stomach issues.  Plus, no more inhalers!  My one slip up when I had some mozzarella (about two ounces), I woke up the next morning feeling crappy - wheezy in my lungs and a stuffy nose.  So, I won't be doing that again!  I also have more energy and am sleeping better which is amazing.  I have lost three pounds as well - nice side bonus!

Questions?  Ask!  I am an open book :)

Friday, March 29, 2013

Sweet Italian Sausage Saute

In my pre-Paleo days, I loved ordering a hearty pasta dish with Italian sausage.  These days, pasta is a no-no but, thankfully, sausage isn't!  I get my sausage from Truelove Farms.  Tom, the owner is young and really nice so if you are in the Connecticut area, the farm is definitely worth a trip and he has some great ideas and products there.  But his sweet Italian sausage is my favorite!  So I figured I should create a dish to highlight it and satisfy my sausage and pasta craving.

Recipe

One onion, diced
Two roma tomatoes, chopped
1 Tbs diced garlic (or more!  I love garlic)
2 Tbs Olive oil
1 lb sweet Italian sausage
Italian seasoning
1 large spaghetti squash, roasted (don't know how to roast one?  Go here!)

Start cooking your squash first because it will take longer than the saute.  Before you even start dicing the onion and tomato, have the squash in the oven.

Saute the onion, tomato and garlic in the olive oil over medium heat until the onion is cooked through (but not clear).


Add a good amount of Italian seasoning and mix it all together.


While that is all cooking, carefully cut the sausage links into 1/2 inch to 1 inch chunks (totally up to you on size - whatever you prefer!)

Add those to the pan and continue to cook over medium heat for about ten minutes or until the sausage is cooked through.  You can cover it to help it cook a little faster or if you think there isn't enough "sauce" to adequately coat your squash.

While it's cooking, hopefully your squash is done or close to done so you can start pulling the strings with a fork.  With this recipe, it might be a good idea to put the "spaghetti" strands into a strainer in the sink to strain off some of the extra moisture since you are going to be adding a "sauce" of sorts.

Once your sausage is cooked and your squash is ready, just top the "spaghetti" with the sausage saute and you are ready to eat.  So yummy and hubby approved!

Enjoy!

Wednesday, March 27, 2013

Paleo Pancakes...yes, pancakes!

Yes, you read that correctly...PANCAKES!  In the WP house, pancakes are almost a daily request from the little guy.  And I still have that big bag of Krusteaz mix from Costco for him.  But he will also gladly eat the paleo version and they are so much healthier for him.  Super easy recipe, made even easier with a good blender (I love my Ninja!).


Recipe

1 banana
2 eggs
1 tablespoon of almond butter (this is somewhat optional - I made them without the first time and they were just as delicious so if you have nut allergies in your house, leave it out!)
Shake of cinnamon

I throw all of the ingredients in my Ninja and blend until smooth.  If you don't have a great blender or don't feel like dragging it out, you CAN do this by hand but I would strongly suggest mashing the banana up really well first or you will have lumpy pancakes.

Once mixed, proceed like normal - big or small pancakes both work although if you want to do letter shapes (we are learning our letters!), I would maybe add an extra tablespoon of almond butter to thicken it up.


The mixture will be thinner than a normal pancake mix and therefore more runny.  Have no fear!  The consistency is very similar once cooked.

Important to note that I usually at least double the recipe to feed the three of us on the weekend.  I actually like to triple or quadruple it and then save the leftovers for during the week.  30 seconds in the microwave and they are ready to eat again (although they taste good cold!).

Enjoy!

Tuesday, March 26, 2013

Coconut Curry Scallops and Swordfish

The local fresh fish store has become a go-to place for me on the weekends.  I usually end up taking my three year old which means I don't get a lot of time to peruse and plan and end up just randomly picking stuff to keep the counter guy from staring at me blankly for longer than three minutes.  Which is how I ended up with chunks of swordfish and sea scallops.  I made coconut bread earlier in the day and needed something to compliment it.  A friend suggested a curry dish and this was the result!


Recipe

One pound of sea scallops
One pound of swordfish chunks
Roasted spaghetti squash
Two cups of broccoli
One onion
One can of full fat coconut milk
Garlic - fresh chopped or jarred
Jamaican or Indian curry - whichever you prefer

Add the coconut milk, onion, garlic and curry (about 1 tbs - adjust to your preferred level of heat) to a medium saute pan over medium heat.

Cover and let cook together for five or so minutes.

Add the scallops and swordfish and cover again and let cook for five minutes.

Add broccoli and cover again and cook until broccoli is cooked through, stirring frequently to make sure all ingredients are coated in the coconut curry sauce.

Serve alone or over spaghetti squash.

Note: I think this would work well with any kind of fish or shellfish.  Maybe even chicken.  You can also substitute low fat coconut milk.  I used the Jamaican style curry for mine because I had some we had purchased in Grand Cayman in November.

Sunday, March 24, 2013

Spaghetti Squash

One of the best things about Paleo was my discovery of spaghetti squash.  I seriously cannot get enough of the stuff!  I use it as a base for everything I used to eat with pasta and rice or eat it on its own.  Super simple to make and great for you.

Roasted Spaghetti Squash

Preheat over to 375 degrees.

Get out your muscles!

Using a large, heavy knife very very carefully, cut the spaghetti squash in half length wise.  This takes a good deal of force so please, please be careful.  I will sometimes use a meat tenderizing hammer over a dish towel on the back of my knife and tap the knife in and through.

Clean out all the seeds and strings (I am saving the seeds to grow but you can roast them like pumpkin seeds too!).

Place the squash halves skin side up in a glass baking dish.

Drizzle olive oil over the skins.

Roast for 30-45 minutes depending on the size of the squash.  If it is softball size, go for 30 minutes.  Two softballs together, better off with 45.

Once done, use a fork to scrape the "spaghetti" strings out.  Top with olive oil, garlic and seasonings or your favorite other recipe (I will post a few soon!).

YUM, enjoy!

Saturday, March 23, 2013

Everyday Working Paleo

My husband suggested that all my posts didn't have to be recipes.  And he is right.  Part of this journey is how to function within Paleo constraints and a super busy lifestyle.  A question people ask me all the time (after I tell them I don't eat dairy, grains, legumes or anything processed) is "What DO you eat?"  Understandable for the uninitiated, right?  A snapshot of my "food day" looks something like this:

Morning - 2 eggs medium boiled with a sprinkling of sea salt.  I like my eggs still warm but if you don't mind a real hard boiled egg or cold, you could make these ahead by the dozen and save a bunch of time in the morning.  Usually I pop mine in the water while I make my 3 year old's waffles (no, he isn't Paleo...yet) and once boiling, set the timer for six minutes and go about my business getting ready for work.

I also pack my food for the day in the morning but a lot of the prep work is done in the evening or on weekends.  For instance, I buy a huge container of strawberries at Costco and wash and cut them all up immediately and store in a large container to be portioned out when needed.  Hubby wanted me to include that every weekend we (meaning "he") grills up a whole family size package of chicken breasts and then cuts them into strips for topping salads or just for snacking.

Snacks - I pack for snacks one fruit snack, sometimes two and a small bag of almonds.  A good friend (who will be guest posting her granola recipe soon!) suggested buying the four pound jug of almonds at Costco and portioning them into ziploc bags immediately upon returning home to throw quickly into the daily food bag.  Great idea.

Lunch - Generally a salad or leftovers from the night before.  Again, when I get home from my trusty Costco with my enormous bag of romaine lettuce, I wash, spin and chop it right away and store it in a large container with a damp paper towel (keeps it from drying out and/or getting rusty).  So I just throw some in a tupperware, top it with the aforementioned grilled chicken and whatever else happens to be in the fridge.  Often I will roast brussel sprouts and broccoli over the weekend and the leftovers are saved to top salads.  Or cook up a bunch of bacon which is also so yummy on salads.

Dinner - that's what my recipes are for!  Spaghetti squash is my current favorite but Paleo dinners are pretty easy.  Meat and vegetables, YUM!

Questions?  Ask them!

Friday, March 22, 2013

Dessert Idea

One thing that has been super difficult for me is to give up sweets.  I have a MAJOR sweet tooth and I love ice cream, among other things.  I thought that I would be giving up sweets completely because I was pretty much giving up all processed foods which includes sugar.

Thank god for my friends!

My new favorite dessert - dates smeared with almond butter.  YUM!  I love this to the point where we have four boxes of Girl Scout cookies (ordered pre-Paleo).  I tried one cookie from each box and they just didn't taste very good.  All I wanted was my dates.

Shopping Tip: both dates and almond butter can be really expensive.  Luckily, Costco carries both - stock up!

Thursday, March 21, 2013

First Recipe - Braised Bacon Spinach with Olives

I must admit, I am not a huge fan of spinach.  But hubby likes it and I know it is good for me.  So we bought a big old bag of it at Costco.  I hit up the local fish market for some wild caught Artic Char and got creative.

Here an "in progress" picture


Recipe

A few handfuls of raw spinach
Mixed kalamata and green olives, chopped
Very fatty bacon with the fat separated from the meatier parts - 6 or so slices
Chopped fresh or jarred garlic
Sea salt to taste

Put the bacon fat in a medium skillet over medium heat and cook until it melts.

Add the garlic and desired amount of sea salt.  Cover and cook over medium for two minutes.

Toss in the olives and bacon and cook until the bacon is cooked through.

Add the spinach and toss to coat in the bacon fat and other ingredients.

Cover and remove from heat.

Let sit for ten minutes or so until the spinach is wilted.

I served the artic char on top of the bed of spinach.  To prepare the fish, I cut slits in the top and inserted small pieces of bacon fat.  I added italian seasoning and garlic and broiled for 20 or so minutes.

End result was delicious!


Paleo

Two weeks ago, hubby and I started our Paleo journey.  Suffice to say, we have tried many different weight loss programs over the years.  We are still fat.  At this point, it's more about health - blood sugar for him and allergy issues for me.  Paleo seemed right for us.

I love to cook and wanted a place to keep track of and share my recipes and recipes that I borrowed from others and enjoyed (or didn't!).  I also work full time and have a three year old so quick but tasty recipes are key to my lifestyle.  I will be sharing recipes as well as tips and tricks for making Paleo work for everyone who lives a busy life.

Join us on our journey.  Ask questions, make suggestions, and enjoy your food!

Julie